[신한카드] RPM Platinum# 카드 신형 쓸만 한가요? (구형과 비교 분석)
필자는 구형 RPM Platinum# 카드를 잘 사용하고 있습니다. (많은 카드 체리피커들이 소장하고 애용하는 카드입니다.)
** 카드 체리피커 (card cheery picker) ; 체리픽커란 맛난 체리만 따먹는 약삭빠른 사람을 말합니다.
이런 좋은 카드가 단종되고, 버전 업된 신형 카드가 출시되었습니다.
- 신형카드를 분석하면, 왜 구형카드가 폐지 되었는지를 알 수 있습니다.
- 카드사에서 고객의 생각해서 더 좋은 혜택을 주려고, 신형카드를 개발한건 절대! 절대! 아니겠죠? ^^
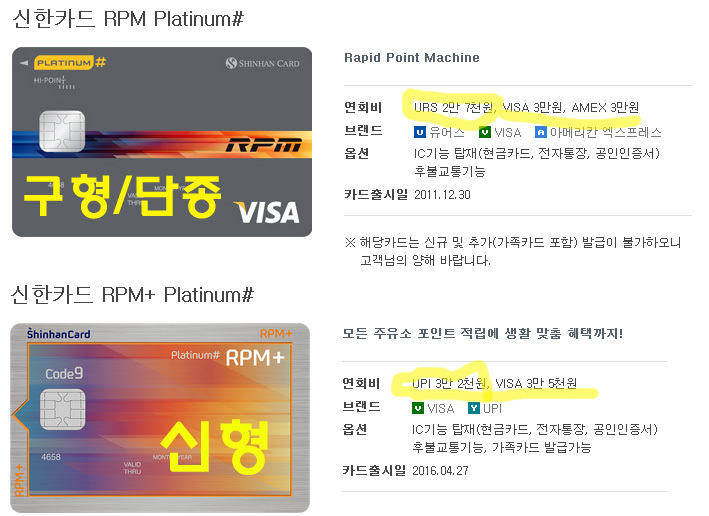
1. 연회비 분석
구형 ; URS 2만 7천원, VISA 3만원, AMEX 3만원
신형 ; UPI 3만 2천원, VISA 3만 5천원
==> 신형이 5천원 인상되었습니다.
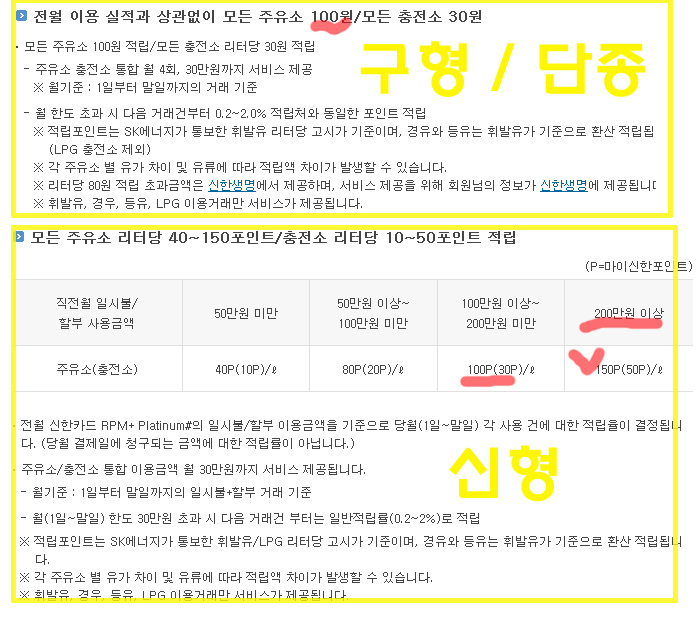
2. 주유 할인
구형 ; (무실적) 모든 주유소 리터당 100원 적립 / 모든 LPG 충전소 리터당 30원 적립
신형 ; (실적차등)모든 주유소에서 리터당 40~150포인트 적립 / 충전소 리터당 10~50포인트 적립
==> 무실적 vs. 실적차등
==> 신형카드로 100만원 이상 실적일때, 구형카드와 동일 / 신형으로 200만원 이상실적일때, 150 P 적립
==> 월 주유 한도 30만원은 동일 (구형은 회수로 4회 제한 있습니다. 신형은 횟수 제한이 없다 보니, 경차/중소형차 소유자는 좀더 유리하겠습니다. (구형카드는 매회 7만원 이상 주유해야 4x7 = 28만원으로 30만원 혜택을 볼 수 있었습니다. 그래서 항상 가득주유 해야만 했습니다. 적당히 주유해야 차도 가볍고 연비도 좋아지는데 말입니다. 가득주유는 필자의 불만이었는데 신한카드에서 신형 RPM에는 방식을 변경해 줘서 고맙네요.)
3. 적립상세
구형 ; 실적 150만원 이상이면, 모든 혜택을 다 받을 수 있었습니다.
신형 ; 실적 200만원 이상되야, 모든 혜택을 다 받을 수 있습니다.
==> 150만원 최고실적 vs. 200만원 최고 실적
==> 신형카드로는 월50만원을 추가로 사용해야 최고 등급의 혜택을 받을 수 있겠네요.

4. 기타
==> RPM 카드의 또다른 꿀핵은 몇몇 주차장의 무료이용입니다. 이부분은 신형/구형 동일한 혜택이 제공됩니다.
==> 그밖에 구형/신형 다른점이 소소하게 있으나, 위에 언급한 부분이 필자에겐 카드선택의 중요 포인트이므로 소소한 차이는 이글에서 생략했습니다.
결론들어 갑니다.
1. 구형의 장점 ; 신형보다 저렴한 연회비, 무실적 주유혜택 (100원 할인)
2. 신형의 장점 ; 주유시 회수제한 없이 30만원 까지 혜택
3. 그래서 신형을 쓸 예정입니까?
==> NO !
4. 신형의 불편한 점은 무엇인가요?
==> 까다로운 실적 조건 입니다. 단일카드(원카드)로 사용할 경우는 머리를 잘 굴려 써볼 만 하지만, 신한포인트 제한이 5만점이라 주유혜택 모두 받고, 월 200만원 이상 사용한다면, 혜택을 못 받는 금액이 생길듯 합니다. (무슨 말인가 하면, 기존 hi point 계열 신한카드의 실적 최고 금액은 150만원 이였고, 이때, 5만점을 적립하려면, 200~250만원을 사용 해야 했습니다. 이때, RPM 카드는 큰 주유적립 혜택을 주기 때문에 150만원 정도 사용하면, 5만점을 모두 채우게 되는 경우도 있기 때문입니다.)